Extraits du catalogue

ICONICAPOLLON User guide Guide d’utilisation
Ouvrir le catalogue en page 1
Thankyou foryour purchase We thankyou for acquiring an ICONIC® Apollon chair and look forward to guiding you on your quest for refinement and style. You will find in this manual the assembly instructions as well as cleaning and using advisessoyou can getthe most out of your ICONIC® expérience. We invite you to read this manual carefully and to keep it in case of an issue with your product in the future. If you would like more information about the ICONIC® range or would like to give us a feedback, feel f ree to visit our website: www.iconicchairs.com or contact us at the following address:...
Ouvrir le catalogue en page 2
Instructions Usage • Do not use the Appolon chair for other purposes that the ones described in this manual. • The Appolon chair is designed for a person weighing up to 135 kg (298 Ibs). • The Appolon chair is designed for inside usage, household or office purposes. • Do not use the seat in inappropriate places. • Do not use the seat in high or low températures, excessive humidity, etc. Safety ru les • The chair is not intended to children, do not letyoung children play with the chair. • Do not use the chair as a step stool. • Do not stand or kneel on the chair. • Do not sit or apply an...
Ouvrir le catalogue en page 3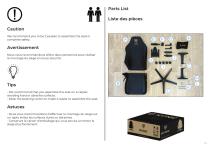
© tt Caution We recommend you to be 2 people to assemble the seat in complété safety. Avertissement Nous vous recommandons d’être deux personnes pour réaliser le montage du siège en toute sécurité. Tips • We recommend thatyou assemble the seat on a carpet, avoiding hard or abrasive surfaces. • Keep the packing carton to make it easier to assemble the seat. Astuces • Nous vous recommandons d'effectuer le montage du siège sur un tapis, évitez les surfaces dures ou abrasives. • Conservez le carton d’emballage qui vous servira à monter le siège plus facilement. Parts List
Ouvrir le catalogue en page 4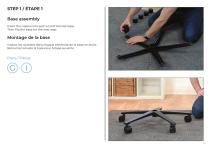
Base assembly Insert the casters into each end of the star base. Then flip the base for the next step. Montage de la base Insérez les roulettes dans chaque extrémité de la base en étoile. Retournez ensuite la base pour l'étape suivante. Parts / Pièces
Ouvrir le catalogue en page 5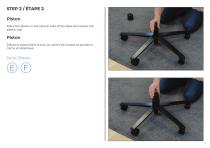
STEP 2 / ÉTAPE 2 Piston Place the piston in the central hole of the base then place the plastic cap. Piston Placez le piston dans le trou au centre de la base et ajoutez le cache en plastique. Parts / Pièces
Ouvrir le catalogue en page 6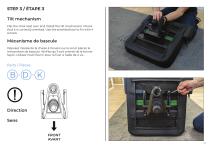
Tilt mechanism Flip the chair seat over and install the tilt mechanism. Check that it is correctly oriented. Use the provided tool to fix with 4 screws. Mécanisme de bascule Déposez l'assise de la chaise à l'envers sur le sol et placez le mécanisme de bascule. Vérifiez qu'il soit orienté de la bonne façon. Utilisez l'outil fourni pour le fixer à l'aide de 4 vis. Parts / Pièces
Ouvrir le catalogue en page 7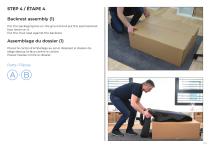
Backrest assembly (1) Put the packaging box on the ground and put the seat backrest face down on it. Put the chair seat against the backrest. Assemblage du dossier (1) Placez le carton d’emballage au sol et déposez le dossier du siège dessus, la face contre le carton. Placez l’assise contre le dossier. Parts / Pièces
Ouvrir le catalogue en page 8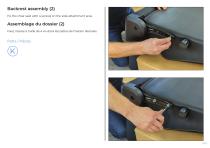
Backrest assembly (2) Fix the chair seat with 4 screws on the side attachment area. Assemblage du dossier (2) Fixez l'assise à l’aide de 4 vis dans les pattes de fixation latérales.
Ouvrir le catalogue en page 9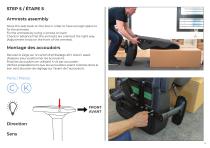
Armrests assembly Move the seat back on the box in order to hâve enough space to fix the armrests. Fix the armrests by using 4 screws on each. Check in advance that the armrests are oriented the right way. (Adjustment knob on the front of the armrest). Montage des accoudoirs Reculez le siège sur le carton d'emballage afin d’avoir assez d'espace pour positionner les accoudoirs. Fixez les accoudoirs en utilisant 4 vis par accoudoir. Vérifiez préalablement que les accoudoirs soient orientés dans le bon sens (bouton de réglage sur l’avant de l’accoudoir). Parts / Pièces FRONT AVANT
Ouvrir le catalogue en page 10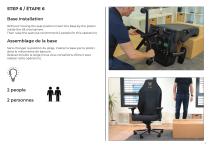
Without moving the seat position insert the base by the piston inside the tilt mechanism. Then raise the seat (we recommend 2 people for this operation). Assemblage de la base Sans changer la position du siège, insérez la base par le piston dans le mécanisme de bascule. Relevez ensuite le siège (nous vous conseillons d’être 2 pour réaliser cette opération).
Ouvrir le catalogue en page 11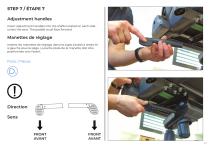
STEP 7 / ÉTAPE 7 Adjustment handles Insert adjustment handles into the shafts located on each side under the seat. The paddle must face forward. Manettes de réglage Insérez les manettes de réglage dans les tiges situées à droite et à gauche sous le siège. La partie plate de la manette doit être positionnée vers l'avant. Parts / Pièces FRONT AVANT FRONT AVANT
Ouvrir le catalogue en page 12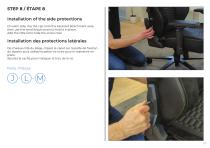
STEP 8 / ÉTAPE 8 Installation of the side protections On each side, clip the cap onto the backrest attachment area, then use the small black screw to hold it in place. Add the little lid to hide the screw hole. Installation des protections latérales De chaque côté du siège, clipsez le capot sur la patte de fixation du dossier, puis utilisez la petite vis noire pour le maintenir en place. Ajoutez le cache pour masquer le trou de la vis. Parts / Pièces
Ouvrir le catalogue en page 13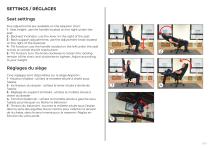
Seat settings Five adjustments are available on the Appolon chair: 1 • Seat height: use the handle located on the right under the seat 2 • Backrest inclinator: use the lever on the right of the seat 3 • Back support adjustments: use the adjustment knob located on the right of the backrest 4 • Tilt function: use the handle located on the left under the seat to lock or unlock the tilt mechanism 5 • Tilt Tension: turn the knob clockwise to loosen the rocking tension of the chair, anti-clockwise to tighten. Adjust according toyour weight Réglages du siège Cinq réglages sont disponibles sur le...
Ouvrir le catalogue en page 14
